TL;DR
Listen free for 30 days with Audible
Thousands of audiobooks and originals — cancel anytime.
Start your free trialAs an affiliate, we earn on qualifying purchases.
Properly labeling meal-prep containers with dates and contents helps prevent food waste and keeps your fridge organized. Use durable labels, consistent formats, and simple systems to stay on top of your meal game.
Use waterproof, smudge-proof labels to extend readability and prevent spoilage.
Always include the prep or storage date and contents for quick recognition and safety.
Create a consistent system—whether color-coding, abbreviations, or templates—to streamline your routine.
Organize containers so labels face outward and are easy to scan at a glance.
Explore eco-friendly and digital labeling tools to make your system smarter and greener.
How to Label Meal-Prep Containers
Dates, contents, and a simple repeatable system turn your fridge into an easy-to-scan inventory. Durable labels reduce guesswork, protect freshness, and help forgotten leftovers get eaten before they become waste.
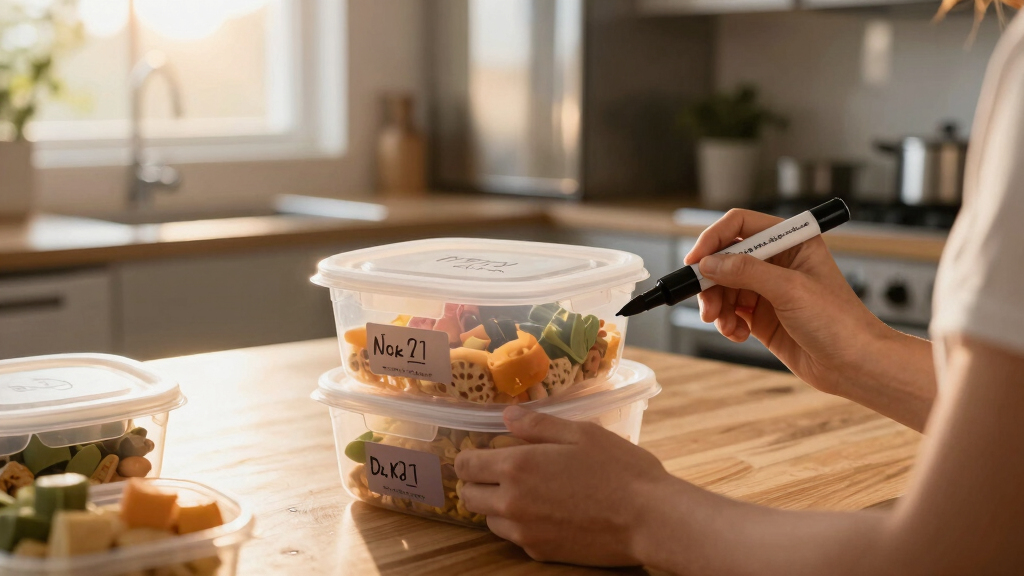
Write what matters—clearly and consistently.
Specific contents and a preparation or storage date create a usable kitchen record. Add reheating notes, portion size, or a use-first cue only when those details genuinely help your household.
Name the actual meal
“Vegetarian chili” is faster and safer to identify than “dinner.” Include the main protein, sauce, or dietary variation when containers look similar.
Choose one date format
Use the same format every time—such as 03/10/2026 or 10 MAR. Consistency matters especially in shared or international households.
Add only useful cues
A “use first,” freezer date, allergen note, or reheating instruction can prevent mix-ups without turning the label into a paragraph.
Match the label to the container and climate.
Condensation, freezing, washing, and stacking all test a label. The right method balances readability, removal, reuse, setup time, and cost.
| Labeling method | Moisture resistance | Reusable | Best setting | Tradeoff |
|---|---|---|---|---|
| Waterproof label | ✓ Excellent | ~ Sometimes | Fridge and freezer | Higher upfront cost |
| Masking tape + marker | ~ Moderate | ✗ No | Short fridge storage | May peel when damp |
| Washable marker | ✓ Good | ✓ Yes | Glass and smooth plastic | Test for smudging |
| Chalk label | ~ Moderate | ✓ Yes | Weekly rotation | Can rub off in stacks |
| QR or NFC tag | ✓ Excellent | ✓ Yes | Detailed digital tracking | Setup time and scanning |
Use the same four-step rhythm every time.
A good system is simple enough to complete while the kitchen is still busy. Label before stacking, keep the format fixed, and make every container readable without moving another one.
Chicken stir-fry
2 portions · refrigerated · use first · reheat until steaming hot
Make the fridge readable without rummaging.
Labeling only works when labels remain visible. Group meals by day or type, place older food at the front, and avoid hiding identifiers against walls or beneath stacked containers.
The 3–4 day fridge window
Cooked leftovers are generally intended for use within three to four refrigerated days. The label creates the reference point; safe cooling, refrigeration, and reheating still matter.
Four rules for quick access
Color is a shortcut—not the whole label
Use color to signal categories such as protein, vegetarian meals, allergens, or weekdays. Always pair the color with written contents and a date so the system remains understandable to everyone.
Reusable and digital upgrades
Washable markers and reusable labels reduce disposable waste. QR codes or NFC tags can hold ingredients, nutrition details, freezer dates, and reheating instructions without crowding the visible label.
One clear label supports the entire meal cycle.
Why Clear Labels Save You Time and Food Waste
Clear labels are more than just pretty tags—they’re your kitchen’s memory. They tell you at a glance what’s inside and when it was made, preventing you from eating spoiled food or tossing leftovers too late. For example, a well-labeled container with “Chicken Stir-fry, 03/10” quickly reminds you that it’s still safe to eat, unlike unlabeled or poorly marked food that can sit forgotten and spoil.
Research shows that properly labeled leftovers can cut down waste by up to 30%. Plus, they make meal planning easier—no more guessing which container holds what or when it was prepped.
Beyond saving food, clear labels help avoid health risks associated with eating spoiled leftovers, which can lead to food poisoning. They also promote mindful consumption—by seeing expiration or prep dates clearly, you’re less likely to overconsume or forget about your stored meals. This simple step can significantly improve safety and efficiency in your kitchen, especially when managing multiple containers or sharing space with others.
As an affiliate, we earn on qualifying purchases.
How to Choose the Right Labeling Method (and Why It Matters)
- Decide on your labeling tools: Waterproof labels, masking tape, or chalk markers—each has pros and cons. Waterproof labels resist moisture and smudging, ideal for fridge or freezer use where condensation is common. Reusable washable markers work well on glass or plastic containers that you clean regularly, offering flexibility and reusability. Choosing the right tool impacts durability; for example, a cheap paper label might peel or smudge easily, leading to confusion or the need for frequent re-labeling, which wastes time and resources.
- Pick your format: Use a consistent date format, like MM/DD/YYYY, to avoid confusion—especially if you share your kitchen with others or have international visitors. Recognizing contents quickly is crucial when you’re in a rush, so write clear, specific descriptions such as “Vegetarian Chili” instead of vague labels like “Dinner.” This reduces the chance of misidentification, which can lead to waste or unsafe consumption.
- Place labels smartly: Stick them on the lid or the side of the container. Position labels where they won’t get smudged or peeled off during stacking or washing. Proper placement ensures visibility and longevity; if labels are hidden or placed on curved surfaces, they might peel or become hard to read over time. Well-placed labels streamline your workflow, making it easy to identify and access your meals quickly, especially when your fridge is crowded.
For example, a busy week of prepping chicken salads might involve a stack of containers labeled with bright, waterproof stickers. This way, when you’re rushing to grab lunch, you see exactly what’s fresh and ready. The tradeoff is that some labels might be more expensive or require more setup time initially but pay off through durability and clarity over many uses.
As an affiliate, we earn on qualifying purchases.
Creating a Simple Labeling System That Sticks
Consistency turns labeling into a breeze. Developing a system that aligns with your routine—whether through color codes, abbreviations, or templates—ensures it becomes second nature. For example, using blue labels for seafood immediately signals the type of protein, reducing the risk of cross-contamination or mix-ups. Similarly, abbreviations like “Chx” for chicken save space and speed up recognition. The key is to choose a system that’s intuitive for you and your household, so it doesn’t require constant explanation or adjustment.
Here’s a quick system to try:
- Always include date of prep to track freshness.
- Write contents right after or underneath the date for quick recognition.
- Use color-coded labels for meal categories or days—this helps visually organize your fridge and makes identifying meals faster.
This approach minimizes confusion and ensures that even in a rush, you can confidently select the right meal. Over time, your system becomes second nature, reducing decision fatigue and making meal prep more efficient and less stressful.
As an affiliate, we earn on qualifying purchases.
Smart Storage: Organize Your Labels and Containers for Quick Access
Labeling is only half the game. Organizing your containers so labels are visible and accessible maximizes their usefulness. Use clear bins or dedicated shelves for different meal types or days—this creates a visual cue for what’s inside and helps prevent forgotten leftovers. Store leftovers in the front of the fridge for quick access; facing labels outward ensures you can read them without rummaging through stacks, saving time and reducing frustration.
For example, grouping all Monday lunches together with bright labels makes meal selection faster and more straightforward. Additionally, arranging containers neatly minimizes the risk of spills or accidental mixing, which can compromise food safety. An organized system also encourages regular cleaning and relabeling, maintaining clarity over time, and avoiding the accumulation of outdated labels or forgotten items. The tradeoff is that initial organization might take some effort, but it pays off through long-term efficiency and peace of mind.
As an affiliate, we earn on qualifying purchases.
Eco-Friendly and Tech-Driven Labeling Options
Going green doesn’t mean sacrificing clarity. Reusable labels or washable markers on glass containers significantly cut down on waste, making your kitchen more sustainable. For example, using chalk markers that wipe clean allows you to update labels weekly without creating waste from disposable stickers. These options are cost-effective over time and promote eco-conscious habits.
For tech lovers, QR codes or NFC tags are a clever upgrade. You can attach a small tag to your container with a QR code linking to detailed info—ingredients, reheating instructions, or expiration dates—accessible via your smartphone. This method reduces clutter and keeps your labels clean while providing comprehensive data at your fingertips. Integrating digital tools with traditional labeling not only enhances organization but also adds a layer of information that can improve food safety and reduce waste by reminding you about expiration dates or specific reheating instructions. The tradeoff can be initial setup time and cost, but the long-term benefits include smarter, greener kitchen management.
Frequently Asked Questions
What is the best way to label meal-prep containers?
Use durable, waterproof labels or masking tape with a permanent marker. For extra durability, consider pre-printed labels or color-coding systems that fit your routine.How long can I store meal-prepped food safely?
Most cooked leftovers stay good for 3-4 days in the fridge, according to USDA guidelines. Frozen meals can last 2-3 months, depending on ingredients and packaging.What information should I include on my labels?
Always include the contents, the prep or storage date, and, if needed, reheating instructions or expiration info. Keep it simple and consistent.Are eco-friendly labeling options effective?
Yes, reusable labels, washable markers, and biodegradable stickers work well and reduce waste. Just ensure they’re durable enough for your storage conditions.How can I keep my labeling system organized over time?
Develop a routine—use color codes or abbreviations, keep labels facing outward, and store containers in clear, designated shelves. Review and refresh labels as needed.Conclusion
A well-thought-out labeling system transforms your fridge from chaos into clarity. It’s a simple step that saves time, cuts waste, and keeps your meals fresh. The next time you prep, grab a marker—your future self will thank you for the clarity and confidence it brings.Flea & tick season Picks
flea and tick prevention
As an affiliate, we earn on qualifying purchases.