
TL;DR

Get kitchen gear delivered free with Prime
- Fast, free delivery on millions of items
- Prime Video, Amazon Music and more included
- Member-only deals all year
Stains and odors in meal-prep containers are common but manageable. Using natural solutions like baking soda, vinegar, and lemon, along with regular maintenance, keeps your containers clean and odor-free. Upgrading to stain-resistant materials can also make cleanup easier.
Promptly clean containers after each use to prevent stains and odors from setting.
Use natural solutions like baking soda, vinegar, and lemon for effective, eco-friendly cleaning.
Avoid abrasive scrubbers on delicate containers to prevent scratches that trap residues.
Switch to glass or stainless steel containers to resist staining and odors better than plastic.
Replace containers when stains, odors, or damage become persistent despite cleaning efforts.
How to Remove Stains and Odors From Meal-Prep Containers
Tomato sauce, curry, berries, and greasy leftovers can cling to containers long after lunch is gone. The fix is simple: clean quickly, match the method to the material, and use gentle natural cleaners before stains and smells settle in.
Key insight
Plastic containers can be up to 4 times more prone to staining and odor retention than glass or stainless steel, making material choice the biggest long-term freshness lever.
More prone to stains and odor retention than non-porous materials.
Enough for light odors; overnight for stubborn residue.
Three parts baking soda to one part water for stain lifting.
Avoid abrasive scrubbers that create residue-trapping grooves.
Why containers get stained and smelly
Stains and odors happen when food residues bind to container surfaces. Plastic is especially vulnerable because dyes and oils seep into tiny pores and scratches. Fast washing breaks the cycle before color, grease, and smell become part of the container.
Color-rich foods
Tomato sauce, curry, berries, and paprika-heavy dishes leave pigments that cling to porous plastic.
Greasy residue
Oil carries odor molecules and helps them stick, especially when containers sit unwashed.
Surface damage
Scratches and warping trap residue, making even good soap less effective over time.
The natural cleaning toolkit
Baking soda, vinegar, lemon juice, and hydrogen peroxide handle most container problems without harsh scrubbing. Use the gentlest option first, then step up only when stains or odors persist.
Baking soda paste
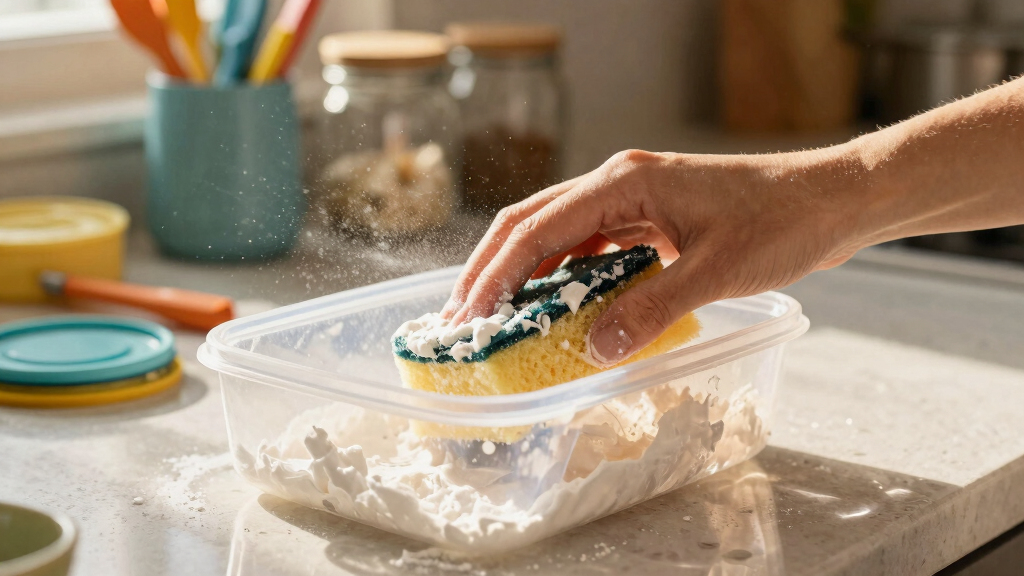
Mix 3 parts baking soda with 1 part water. Apply to stains, let it sit, scrub gently with a soft brush, then rinse well.
White vinegar soak
Fill the container with vinegar for 30 minutes to overnight. This helps neutralize odors and loosen residue.
Lemon brightening
Use fresh lemon on stains or pair it with baking soda. Avoid long soaks on delicate plastic to reduce discoloration risk.
Hydrogen peroxide
Use cautiously for stubborn stains. Test a small area first, especially on plastic, then rinse thoroughly.
Cleaning method by material
Match the cleaner to the container. Glass is forgiving, stainless steel is durable but scratch-sensitive, and plastic needs the most caution because it absorbs dyes and odors more easily.
| Method | Plastic | Glass | Stainless Steel |
|---|---|---|---|
| Baking soda & vinegar | ✓Excellent; safe for most plastics. | ✓Excellent; no staining risk. | ✓Good; avoid abrasive pressure. |
| Lemon juice | ~Use cautiously; prolonged contact may discolor. | ✓Great natural brightener. | ✓Effective with low damage risk. |
| Hydrogen peroxide | ~Effective, but test first. | ✓Safe when rinsed well. | ✓Safe when used properly. |
| Abrasive scrubbers | ✗Avoid; scratches trap odors. | ~Usually unnecessary. | ✗Can scratch the finish. |
The fresh-container flow
Routine beats rescue cleaning. This simple sequence prevents most stains and odors before they need a deep-clean intervention.
Empty fast
Do not let saucy or greasy leftovers sit for a day.
Rinse warm
Loosen oils and dyes before they bond to the surface.
Wash soft
Use soap and a gentle sponge, not abrasive pads.
Air-dry open
Prevent trapped moisture from creating stale smells.
Store smart
Add baking soda or charcoal for lingering odor control.
Material matters more than most people think
Plastic is convenient, but non-porous options age better. Glass and stainless steel resist color, smell, and surface breakdown, which means fewer frustrating deep cleans.
Cleaning intensity ladder
Start with soap and water, then escalate to baking soda, vinegar, lemon, or peroxide only when residue remains. Gentle repetition protects the container better than one harsh scrub.
Pro tips for day-after-day freshness
Small habits reduce the need for heavy cleaning later. The best system keeps residue from setting, moisture from getting trapped, and worn containers from staying in rotation too long.
Rinse immediately
Warm water right after use prevents tomato, curry, and grease from settling into the surface.
Dry before stacking
Air-dry containers fully with lids off so trapped moisture does not create stale odors.
Absorb between uses
Store a pinch of baking soda or a charcoal pouch inside problem containers to capture lingering smells.
Upgrade strategically
Use glass or stainless steel for high-stain foods, then keep plastic for dry snacks or low-risk leftovers.
When to replace instead of rescue
Cleaning has limits. Persistent discoloration, sour smells, cracks, warping, or deep scratches can signal that residues and bacteria are hiding where routine washing cannot reach.
Permanent odor
If baking soda, vinegar, and airing out do not work, the smell has likely embedded too deeply.
Heavy staining
Yellow, red, or cloudy tint that survives multiple deep cleans means the surface has absorbed residue.
Cracks or warping
Damaged containers can leak, trap food particles, and become harder to clean safely.
Traceability chain
Most container problems follow the same path. Interrupt the chain early and the cleanup stays quick.
Frequently asked questions
Quick answers for the stains, smells, and material choices that come up most often.
How do I remove stubborn stains from plastic?
Start with baking soda paste or a vinegar soak. For tougher stains, try hydrogen peroxide after testing a small area first.
What removes lingering odors best?
Baking soda is the most reliable first choice. Sprinkle it inside, let it sit overnight, then wash and air-dry.
Can I use bleach?
Use bleach only cautiously, diluted, and when the container maker allows it. Rinse extremely well afterward.
Which containers resist stains best?
Glass and stainless steel resist staining and odor retention better than plastic because they are less porous.
Why Your Containers Get Stained and Smelly — And How to Stop It
Stains and odors happen when food residues cling to container surfaces, especially if you leave them unwashed. Tomato sauce, berries, and greasy foods are notorious culprits. The key to prevention? Clean promptly and thoroughly after each use. If you ignore this, residues build up, trapping smells and creating stubborn stains.
For example, a plastic container used for spaghetti sauce might develop a pinkish tint and a sour smell if left unwashed for a day. Regular rinsing with soap and water prevents this buildup, but for existing stains or odors, you need targeted techniques.
Understanding why these residues stick is crucial. Plastic porousness allows oils and dyes to seep into tiny surface imperfections, making stains more persistent and odors more difficult to remove over time. This means that immediate cleaning isn’t just about appearance—it directly impacts how long your containers stay fresh and odor-free. Neglecting this can lead to a cycle where stains and smells compound, forcing you to replace containers sooner. Prevention through prompt, thorough cleaning preserves the integrity of your containers, saving money and effort in the long run.
stain-resistant glass food storage containers
As an affiliate, we earn on qualifying purchases.
As an affiliate, we earn on qualifying purchases.
The Best Natural Ways to Remove Stains and Odors
Natural solutions are gentle yet powerful. Baking soda and vinegar top the list for their stain-removing and deodorizing magic. Here’s how to use them effectively:
- Baking soda paste: Mix 3 parts baking soda with 1 part water. Apply to stained areas, scrub gently, then rinse.
- Vinegar soak: Fill the container with white vinegar, let sit for 30 minutes to overnight, then scrub and rinse.
- Lemon juice: Squeeze fresh lemon onto stains or mix with baking soda for a natural bleach and odor neutralizer.
For stubborn stains, hydrogen peroxide can be a game-changer. Use it cautiously—test on a small area first, especially on plastics, to prevent damage. When applied correctly, these natural solutions work on breaking down dyes and oils embedded in container surfaces, which are often the root cause of persistent stains and odors. The key is consistency—regular application prevents buildup and keeps containers looking and smelling fresh. Additionally, understanding the chemistry helps you choose the right method for each stain or odor, balancing effectiveness with the material’s safety.
stainless steel meal prep containers
As an affiliate, we earn on qualifying purchases.
As an affiliate, we earn on qualifying purchases.
Comparison Table: Cleaning Methods for Different Container Materials
| Method | Plastic | Glass | Stainless Steel |
|---|---|---|---|
| Baking soda & vinegar | Excellent; safe for most plastics | Excellent; no risk of staining | Good; avoid abrasives to prevent scratching |
| Lemon juice | Use cautiously; may cause discoloration if prolonged | Great; natural bleaching | Effective; no damage risk |
| Hydrogen peroxide | Effective; test first to avoid plastics damage | Safe | Safe |
| Commercial stain removers | Check label; some plastics may discolor | Suitable | Use as directed |
Choosing the right cleaning method depends on the material because each has different vulnerabilities and strengths. For example, plastics are porous and can absorb dyes and oils, making some cleaning agents more effective but also risking damage if used improperly. Glass, being non-porous, resists staining and retains clarity longer, making it more forgiving for various cleaning solutions. Stainless steel’s durability allows for more aggressive methods, but abrasive cleaners can scratch its surface, which might trap residues. Understanding these nuances helps you select the most effective and safe cleaning approach, extending the lifespan of your containers and maintaining their appearance and function.
natural odor eliminating spray for containers
As an affiliate, we earn on qualifying purchases.
As an affiliate, we earn on qualifying purchases.
Pro Tips for Keeping Containers Fresh Day After Day
- Rinse immediately after use to prevent residue setting in, as this reduces the need for intensive cleaning later and prevents the buildup of stains and odors.
- Air-dry containers thoroughly before stacking or storing; moisture trapped inside can promote mold growth and odor development.
- Use baking soda or charcoal inside containers between uses to absorb lingering smells; this is especially helpful if you store strongly scented foods or have had previous odor issues.
- Consider switching to glass or stainless steel for less staining and odor retention, as these materials are less porous and easier to keep clean long-term.
- Regularly deep-clean with natural solutions to keep stubborn stains and smells at bay—this prevents minor issues from becoming major cleaning challenges and extends the life of your containers.
Maintaining a routine that emphasizes these practices can significantly improve your storage experience. When you prevent residues and odors from taking hold, you reduce the frequency and intensity of cleaning needed, saving time and effort. Moreover, choosing durable, non-porous materials minimizes the risk of long-term staining and odor retention, which can be difficult to reverse once established. Consistent, mindful maintenance creates a cycle of freshness that enhances food safety, flavor, and overall kitchen hygiene.
baking soda vinegar cleaning kit for kitchen
As an affiliate, we earn on qualifying purchases.
As an affiliate, we earn on qualifying purchases.
When and Why to Replace Your Containers
Even with diligent cleaning, some containers lose their battle against stains and odors. If your container shows persistent discoloration, smells that won’t go away, or cracks and warping, it’s time for a new one. A fresh container not only looks better but also reduces the risk of bacteria hiding in scratches or stains.
For example, a plastic container with a persistent yellow tint and a sour smell after multiple cleanings is a clear sign it’s time to retire it. Investing in high-quality glass or stainless steel containers can save you headaches and keep your food safe.
Choosing to replace rather than endlessly attempt to clean stubborn containers is a matter of health and practicality. Over time, microcracks and surface degradation can harbor bacteria and make thorough cleaning impossible, leading to potential health risks. Additionally, worn-out containers may leak or break, posing safety hazards. Upgrading to durable, non-porous materials like glass or stainless steel often offers a longer-term solution, reducing the frequency of replacements and ensuring your food stays safe and your storage looks appealing.
Frequently Asked Questions
How can I remove stubborn stains from plastic containers?
Start with a baking soda paste or soak in vinegar for a few hours. For tougher stains, hydrogen peroxide works well—just test first to avoid discoloration. Scrubbing gently with a soft brush helps lift the stain without scratching.
What’s the best way to eliminate lingering odors?
Baking soda is your friend. Sprinkle a generous layer inside, leave it overnight, then rinse thoroughly. For extra freshness, add a few drops of lemon juice before rinsing.
Are natural cleaning remedies safe for all containers?
Yes, vinegar, baking soda, lemon juice, and hydrogen peroxide are generally safe when used properly. Always test on a small area first, especially on plastics, to prevent any damage or discoloration.
Can I use bleach on my containers?
Bleach can be effective but should be diluted and used cautiously. Rinse thoroughly afterward, and avoid using on plastic containers that could crack or discolor. It’s best to stick with natural solutions for everyday cleaning.
How often should I replace my meal-prep containers?
When stains or odors persist despite cleaning, or if the containers show cracks, warping, or discoloration, it’s time for a new set. High-quality glass or stainless steel options usually last longer and resist staining better.
Conclusion
A clean container isn’t just about looks — it’s about health, flavor, and ease. Regular maintenance using simple, natural tricks keeps your meal prep fresh and odor-free. Remember, a little prevention goes a long way—and your future self will thank you for it.Halloween Picks
halloween
As an affiliate, we earn on qualifying purchases.